THE ZIPSTITCH / FUTURE IN SUTURE
- Future Med

- Jun 29, 2019
- 1 min read

INTRODUCTION:
Patch that closes wounds without stitches
Simple ,secure way for a consumer to close minor cuts and minor lacerations at home in emergency
APPLICATIONS
Used in orthopedic total joint arthroplasty, foot and ankle.
Used in surgery ,trauma , spine ,dermatology.
ADVANTAGES/BENEFITS :

The ZipStitch is a DIY hoe laceration kit that allows you to easily close and heal deep cuts.
Wound closure without needles, skin puncturing and associated pain.
Easy to handle and control.
Ability to adjust and customize the tension across the length of the wound so users can precisely control how they close the wound.
ZipStitch acts as a scaffold or cage around the wound, isolating and protecting the wound from user movement that can pull on the wound and disrupt healing.
8X stronger than stitches .
HOW TO APPLY / PROCEDURE :

STEP 1. Very important:
As with any adhesive bandage, area must be dry for adhesive to stick properly.

STEP 2.
Remove clear liner.

STEP 3.
Center device on wound and press firmly on skin.

STEP 4.
Remove paper frame.

STEP 5
Hold lock in place and pull strap to tension. Repeat for each strap. Do not over-tighten. If device is overtightened, remove and replace with another device.

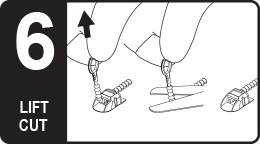
STEP 6.
Cut each strap as short as possible by lifting loop and cutting close to lock housing.
BUY ONLINE :
https://www.amazon.com/ZipStitch-Laceration-Kit-Surgical-Home/dp/B07KBFVHY6
THANKS FOR READING :)


Comments